Google
 
Showing posts with label ubuntu. Show all posts

Monday, December 26, 2011

LinuxMint Debian and adjustments

I recently moved to Linux Mint Debian after using Ubuntu for since quite a while. (Reason: Like many, I'm not so much fond of Unity)

However, Debian is not as polished as Ubuntu. Here are some of the fixes I made:

Installing 686-pae kernel

LM Debian comes with 486 kernel, which has support for single CPU only. The first thing to do is install 686-pae kernel

# apt-get install linux-image-686-pae

Reboot and choose the new kernel.

Installing Virtualbox

Virtualbox is available in the repository.

# apt-get install virtualbox

However, virtualbox wont work because of the newly installed 686-pae kernel, so we need to rebuild the vboxdrv modules. This requires linux headers for 686-pae kernel.

# apt-get install linux-headers-686-pae

This should rebuild the vboxdrv modules automatically, post installation. But if it doesnt, do the following:

# dpkg-reconfigure virtualbox-dkms

Installing Wine

Unfortunately, Wine is not available in the repo. Use the repo at http://www.lamaresh.net/

Add the following line to /etc/apt/sources.list, or via Synaptic - Settings - Repositories - Other Software - Add

deb http://www.lamaresh.net/apt squeeze main

Then update and install.

# apt-get update
# apt-get install wine


Fixing Mint-X themes

There are two Mint themes, Mint-X and Mint-X-Metal, which are very soothing and greenish. However there's a little glitch with expander plus (+) signs (eg, visible while installing software using Synaptic). To fix, open /usr/share/themes/Mint-X/gtk-2.0/gtkrc file (as root) and remove the following line:

GtkExpander::expander_spacing = 16

Do the same for /usr/share/themes/Mint-X-Metal/gtk-2.0/gtkrc too.

Also, if you want to change the font size for panels, look for font_name variable in this gtkrc file.

Few other changes

You might also wanna install ttf-devanagari-fonts and ttf-mscorefonts-installer. Also download the latest Firefox (currently 9.0) and install it to /opt/firefox/

# tar -jxf firefox-9.0.tar.bz2 -C /opt/

Tuesday, May 10, 2011

Grub2 recordfail FAIL

I have this headless, keyboardless server running on Ubuntu 10.04. Runs fine, but once in a while while there's power cut off the server still remains dead when the power is back. I connected monitor and keyboard and found that the problem is with Grub2.

Turns out there's a variable named recordfail which is set to 1 during next boot whenever there's some problem with the computer (like due to power failure).

Now if you see /boot/grub/grub.cfg file, it has the following lines:

if [ ${recordfail} = 1 ]; then
set timeout=-1
else
set timeout=10
fi
Which means, the timeout counter is disabled whenever the recordfail variable is set. This is nice for desktop environment, which has a monitor, so I can see the Grub countdown is disabled so I can proceed with Repair option if I have to, but for headless servers the computer just sits idle at Grub screen, puzzling the poor sysadmin.

Fix? I changed the timeout=-1 to timeout=10.

Thursday, February 03, 2011

Fixing resolution for bigger external monitor

If you happen to connect our Linux laptop or netbook to an external monitor, you're likely to get into resolution trouble. For smaller resolutions (<=1024x768), it's not a bigger deal but once you try higher and unusual resolutions, like 1440x900, things don't turn out that well. Here's how to switch to such resolutions under (Ubuntu) Linux. I'm connecting my laptop (Intel 845GM chipset) to an external monitor (1440x900 native).

Fire up terminal and run the following command; first calculate VESA CVT mode lines

$ cvt 1440 900
Output:
# 1440x900 59.89 Hz (CVT 1.30MA) hsync: 55.93 kHz; pclk: 106.50 MHz
Modeline "1440x900_60.00" 106.50 1440 1528 1672 1904 900 903 909 934 -hsync +vsync

Now, lets see my card's supported resolutions out of the box.
$ xrandr
Output:
Screen 0: minimum 320 x 200, current 1280 x 800, maximum 4096 x 4096
VGA1 connected (normal left inverted right x axis y axis)
1360x768 59.8
1024x768 60.0
800x600 60.3 56.2
848x480 60.0
640x480 59.9 59.9
1440x900_60.00 59.6
LVDS1 connected 1280x800+0+0 (normal left inverted right x axis y axis) 331mm x 207mm
1280x800 59.9*+
1024x768 60.0
800x600 60.3
640x480 59.9
TV1 disconnected (normal left inverted right x axis y axis)

In the above output, VGA1 is the external monitor and LVDS1 is the laptop's LCD panel. Now use the modeline information to create a new custom resolution and add it to VGA1
$ xrandr --newmode "1440x900"  106.50  1440 1528 1672 1904  900 903 909 934 -hsync +vsync
$ xrandr --addmode VGA1 1440x900
The changes are temporary though. If you want it to make it permanent, add them to ~/.xprofile

Now go to System > Preferences > Monitors. The external monitor's list of resolutions should show 1440x900.

Some more info:
Connecting to external monitor has two options, mirror or extend. Choosing mirror gives the same output to both monitors. Extend, well, extends the display over both monitors. But it has a catch: for Compiz to extend over external monitor, the maximum possible horizontal resolution (see first line of xrandr output above, in my case 4096) should be at least double of sum of total horizontal resolution of two monitors.

In my case, if I try to extend my 1280x800 to an 1440x900 external monitor, its not gonna work as 2*(1280+1440)=5440 > 4096. So mirroring is the only option. However if you set the resolution while compiz is on, it's gonna be "confused". Here's the workaround:

1. Add the custom resolution as described above
2. Disable Compiz (System > Preference > Appearance > Visual Effects > None)
3. Change Resolution, and set the laptop's output to off
4. Enable Compiz again

Saturday, December 25, 2010

Load Balancing LTSP clients using Ethernet Bridging

Typical LTSP setup has the following configuration:


+-------------+
| Server |
+-------------+
| eth0 | eth1 |
+------+------+
/ |
/ |
Internet Switch
|
+---------+-------------+
| | |
Client-1 Client-2 ... Client-n

LTSP Clients

The problem with this is that the network card bottlenecks the performance. Once the number of clients increases (usually >5), even though the server is capable of handling the load, the network card (usually, 100BASE-TX) can't provide the throughput.

There are two solutions to this:
1. Use 1000BASE-T (gigabit) ethernet cards and switches
2. Use load balancing

Using gigabit ethernet cards solves the problem but they are expensive. The switches are expensive too. Plus there are flow control problems if the clients have 100Base-TX cards, which is usually the case.

Load balancing is an easier and cheaper approach. Although this can also go fairly complicated, here i'm going for the simplest one using ethernet bridging.

The trick is to use multiple NICs connected to multiple switches. Then bridge the cards to provide a common interface. Here's what it looks like:

+--------------------+
| Server |
+------------------- +
| eth0 | eth1 = eth2 |
+------+------+------+
/ | |
/ | |
Internet Switch Switch
| |
+----+-------+ +----+-------+
| | | | | |
C-1 C-2 ... C-n C-1 C-2 ... C-n

LTSP Clients LTSP Clients

Lets say, there are three NICs: eth0, eth1 and eth2. eth0 is connected to internet. eth1 (say, 192.168.0.254) is connected to LTSP clients. eth2 is unused and is supposed to be bridged with eth1.

First install bridge-utils
# apt-get install bridge-utils
Create a bridge (br0) and add eth1 and eth2 to it
# brctl addbr br0
# brctl stp br0 off
# brctl addif br0 eth1
# brctl addif br0 eth2
Now release the IP addresses of eth1 and eth2
# ifconfig eth1 down
# ifconfig eth2 down
# ifconfig eth1 0.0.0.0 up
# ifconfig eth2 0.0.0.0 up
Assign the LTSP IP address to bridge.
# ifconfig br0 192.168.0.254 up
Now connect eth1 and eth2 to separate switches, and each switch to (equal number of) LTSP clients.

Friday, April 03, 2009

Fixing Nepali Unicode in Ubuntu

Setting up to type Unicode Nepali in Ubuntu is easy (just add Keyboard Indicator applet and add Nepali Layout). For more, follow this article in Ubuntu Nepali wiki. However there are few glitches.

Incomplete keyboard layout
The Nepali Romanized Keyboard layout shipped with Ubuntu (located at /usr/share/X11/xkb/symbols/np) is incomplete. The definition for the whole upper row (1-0 keys) are missing. Also, more importantly, zero-width joiner (ZWJ) and zero-width non-joiner (ZWNJ) characters are wrongly defined (ref: standard layout map).

You can find the working version here: http://www.nepalinux.org/input/ne. So lets, fix it. Fire up your terminal


$ cd /usr/share/X11/xkb/symbols/
$ sudo mv np np.bak
$ sudo wget http://www.nepalinux.org/input/ne -O np
Glyph missing
The devanagari fonts included in the standard Ubuntu installation has few Nepali specific glyphs missing. Most notably, 'pareli ra' or 'samyukta ra' (whatever it is called, the one you use in the word 'paryo').

Well, the fix is to install a font file which has this glyph. My recommendation is Lohit Nepali, available at http://nepalinux.org/fonts/. At terminal,

$ cd /usr/share/fonts/truetype
$ sudo wget http://nepalinux.org/fonts/Lohit-Nepali.ttf
$ sudo fc-cache -fv
Now if you want a specific font file (say, Kalimati) to be used as default devanagari font file, follow the following procedure.

Create a file in /etc/fonts/conf.avail/

$ sudo gedit /etc/fonts/conf.avail/64-ttf-nepali.conf
and paste the following content

<?xml version="1.0"?>
<!DOCTYPE fontconfig SYSTEM "fonts.dtd">
<fontconfig>
<alias>
<family>serif</family>
<prefer>
<family>Kalimati</family>
</prefer>
</alias>
<alias>
<family>sans-serif</family>
<prefer>
<family>Kalimati</family>
</prefer>
</alias>
</fontconfig>
Now, create a symbolic link to it in /etc/fonts/conf.d/

$ sudo ln -s /etc/fonts/conf.avail/64-ttf-nepali.conf /etc/fonts/conf.d/64-ttf-nepali.conf
You might have to restart X to see the changes.

Wednesday, November 12, 2008

Ubuntu Intrepid Ibex Release Party

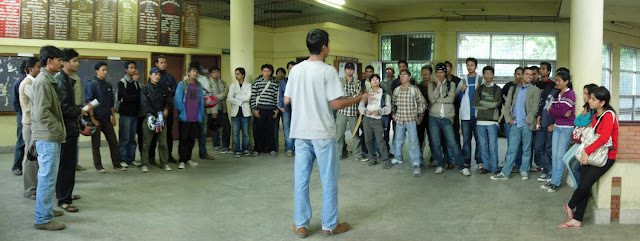
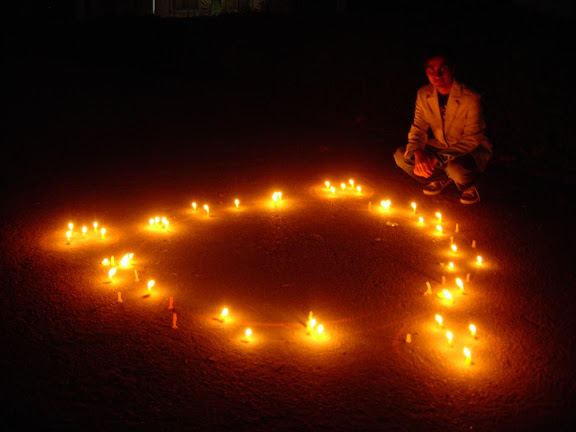
Last Monday we celebrated the release party of Ubuntu 8.10 (Intrepid Ibex) at IOE, Pulchowk Campus. Although the most of the participants were from Pulchowk Campus itself, the program was fun in overall. We even had a candlelight vigil and lucky draw. Release party as good as the new version of Ubuntu!

Details of the party here. Photos: Shankar's Gallery.

Saturday, May 31, 2008

Ubuntu Hardy Release Party on Full Circle Magazine

Issue #13 of Full Circle Magazine is out now! Bibek, Nepbabu and I had written an article about the Ubuntu Release Party that we celebrated sometime back. The article has been published too. :)


The party's photo also made to the cover page..

Download the magazine from here:
http://fullcirclemagazine.org/2008/05/30/issue-13-out-now/

Sunday, May 04, 2008

Ubuntu Hardy Party

Things really move fast in Free and Open Source world, huh. Umm.. let me check my mailbox, the first mail related to ubuntu-np was on March 15th and it was an announcement by nepbabu about the #ubuntu-np IRC channel at irc.freenode.net. In less than two months, we had couple of IRC meetings, pages mushrooming in our wiki and we even set off for the Hardy Release Party / Gettogether. The gettogether was very much nepbabu's idea and he had some serious fortifications going around. ;)

The basic ideas for the party was discussed in our very first IRC meeting. The date and venue were,

Date: Friday, 2nd May, 2008
Venue: Institute of Engineering, ZeroEnergy House
Time: 4 - 6pm, Nepal Standard Time

ZeroEnergy House at IOE was chosen because the building is self sustained, i.e. it takes no energy from outside sources. Perfect for us in this loadshedding laden country!

Shishir with Ubuntu Introduction

Besides presentations and tutorials in the program, we'd one very important task - distribution of Ubuntu and Extra Packages CD/DVD. Ubuntu CD was no big deal, but Extra Packages CD was something we had to work on. Basically this CD/DVD was an APTonCD consisting of all the useful packages (including restricted plugins). This was very important for us to lure people to use Ubuntu coz bandwidth is a big problem in Nepal and IMHO Linux without proper internet connection is like getting stuck at purgatory. ;)

Ankur with Ubuntu and Wubi demo

Saroj (aka Surmandal) was selected for this task. He works at WorldLink ISP and has enough bandwidth to create the Extra Packages CD. The procedures to create the Extra Packages CD was like this:
  1. Get a Ubuntu DVD ready
  2. Install a fresh Ubuntu (either from CD or DVD)
  3. Go to Synaptic, set the source to Ubuntu DVD, select all the packages and download them to local repository. This would download all the packages in the DVD minus packages in Ubuntu CD to the harddisk.
  4. Now download other useful packages (listed at Extra Packages CD page)
  5. After the download, the local repo contains a DVD worth of Packages. Write them to a DVD using APTonCD
Neat huh! ;)

But we seriously needed money for replicating the CDs. Thankfully, Young Innovations Pvt. Ltd. agreed to sponsor NRs. 4000 (thanx Bibek). We called up the CD Replicating guys, the rate was Rs 15 for CD and 25 for DVD. So the plan was to replicate 100 CDs and 100 DVDs (100x(15+25)=4000). So far so good.

But things didn't go as we'd planned. Saroj got the Extra Packages DVD ready, but due to some misunderstandings, the CD Replicator ppl replicated something else. APTonCD became JPTonCD :D. CDs were good however.

We had quite a participation

Finally the big day. The program started right on time. We were to do the following:
  1. Introduction to Ubuntu / FOSS
  2. Ubuntu Demo
  3. Wubi Demo
  4. Tutorial on Getting Ubuntu more useful
  5. Participating ubuntu-np
First one was handled by Shishir. Ankur did 2nd and 3rd. I did the rest. We had around 40+ participants. It was actually more than we'd expected. Although we had a some advertisement about the event, i seriously wasn't expecting that huge number. The program was short and sweet, i guess. Nobody was caught yawning during the program for that sake.. :D

After the program, we had a brief CD sales session. The CD was tagged Rs. 15 to recover the cost. Most of the participants bought the CD too. Lets hope they'll follow the spirit of Ubuntu - 'Pass it on'.

Subir dai with Ubuntu CD

Light refreshment followed. Tea and Cookies. This also gave us time to mingle up with each other and finding out the real person behind the IRC alias. Everyone was like, "OMG that's you?" It was fun..

Now we've still got some money left previously allocated to burn DVDs. We've decided to use it to burn some more CDs and distribute them at FOSS Stall in Locus Tech Fest. It's a huge event and i hope we'll reach more people there..

Thanx to Surmandal and Shankar for the photos.